
Overview
Operator Contact Lists define specific groups of people to send a Message to and in a defined format, such as Email or SMS.
In other words, Contact Lists are Groups of Operators that will receive the one Message/notification that is sent.
Prerequisites
There are privileges in Operator Maintenance to allow individual Operators to send Messages
- To Enable this, select the desired Operator to edit Operator Maintenance > Marketing & Promotions Tab
- Refer to the "Messaging" flags for specific privilege options

- To enable messaging for the Venue, go to Venue Maintenance > Messaging & Billing Tab
- Fill in the necessary details such as Messaging Device Setup, Email Setup, and Scheduled Billing

- Once messaging is enabled in the Venue, the most important setups needed for Messaging are related to Operator and Account Settings, and Contact Lists
- When messaging from BackOffice there are Operator Privileges (above) that need to be checked in order for that Operator to send Messages
- Likewise, the System must have details of each Operator or Account in order to receive a Message
- Email address
- Mobile phone number
- Pager number
- These are incorporated under Address Details and include:
- Furthermore, the "Do Not Email Me" and "Do Not SMS Me" flags must be unchecked

- With these setups in place, Messaging to Operators, Operator groups, Accounts, Account Groups, or Contacts Lists can begin
Operator Contact Lists
- To Access Operator Contact Lists; Go to Messaging > Operator Contact Lists
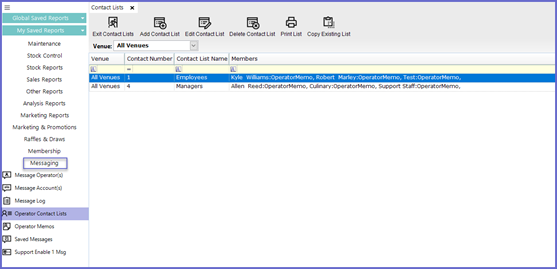
Add Contact List
- To create a new contact list, select the "Add Contact List" button
- A screen similar to below will appear:

- Display Venues: When used, the Contact List will only be available at the chosen Venue/Venue Group
- Name: Give the Contact List a logical Name which will not create confusion among other Operators and prevents the possibility of duplicate lists
- Inactive Flag: Will mark the Contact List as inactive; messages set to be sent to this Group will cease and the Group will no longer be available to view in SmartPOS
- Hide From Till Flag: Will hide the Contact List in SmartPOS; this is often used for Contact Lists that are to be used in the case of "Auto Reports"
- Add New Contact: Select the "Add New Contact" button and the below screen will appear:

- Select the drop-down menu under the Operator heading and choose the 1st operator to add to the contact list
- By adding an Operator Group (these are shown in BOLD) all Operators in the selected Group will be added to the Contact List

- From the Contact Mode drop-down choose the method that will be used to communicate the Message

- The system will populate the Contact Data from the contact information associated with the Operator Record

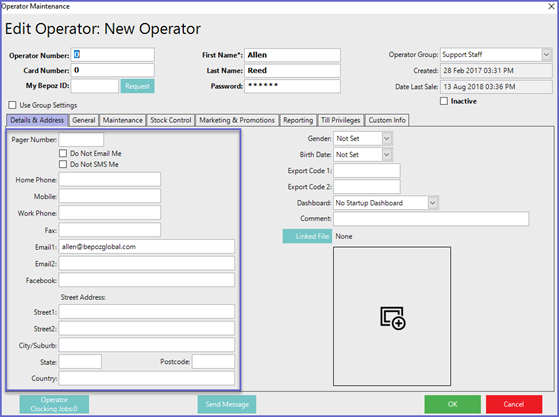
- Edit Operator: The Operator Maintenance screen for the current highlighted operator will be displayed
- Operator contact details ban be Added and Edited from this window; this is an easy way to add any missing details to ensure the Operators receive the required messages
- Delete Contact: Will remove the current highlighted Operator from the Contact List
Edit Contact List
- Opens the Contact List and the same options are available as when creating a new Contact List

Delete Contact List
- Highlight the list to be removed and press the "Delete Contact List" button. The list will be removed
- If the Contact List is being used to send Alerts to, a Warning Prompt will be shown and Operator will be prevented from removing the Contact List
- To remove this List, Operators must first change the assigned Contact List where applicable

Print List
- Will display the list as a PDF ready to print

Copy Existing List
- Will copy the current highlighted Contact List like for like while creating a new Contact Number, Operators can now edit this contact number
- It is strongly recommended that Operators change the name of the copied Contact List so as to prevent confusion